如何使用预训练的模型来分类照片中的物体
卷积神经网络现在能够在一些电脑视觉任务上胜过人类的肉眼,例如图像分类。
也就是说,给出一个物体的照片,我们可以让电脑来回答这个照片是1000个特定 种类物体中的哪一类这样的问题。
在本教程中,我们将使用几个Keras己经内建好的预训练模型来进行图像分类, 其中包括了:
- VGG16
- VGG19
- ResNet50
- InceptionV3
- MobileNet

# 这个Jupyter Notebook的环境
import platform
import tensorflow
import keras
print("Platform: {}".format(platform.platform()))
print("Tensorflow version: {}".format(tensorflow.__version__))
print("Keras version: {}".format(keras.__version__))

%matplotlib inline
import matplotlib.pyplot as plt
import matplotlib.image as mpimg
import numpy as np
from IPython.display import Image
开发一个简单的照片分类器
VGG16
1.获取范例图像
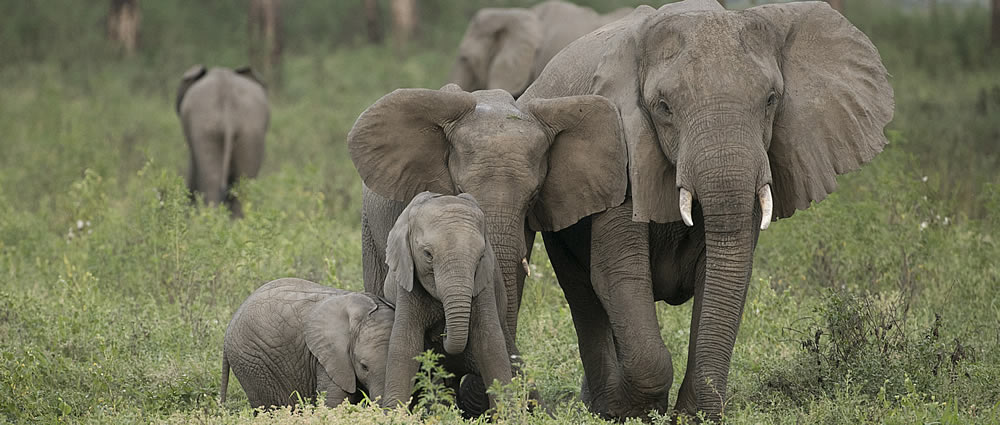
首先,我们需要一个我们可以进行分类的图像。
您可以在这里从Google随意检索一些动物照片并下载到这个jupyter notebook所处的目录。比如说: 我下载了: https://www.elephantvoices.org/images/slider/evimg16tf.jpg

2.加载VGG模型
加载在Keras己经预训练好的VGG-16的权重模型。
from self_vgg16 import VGG16

# 载入权重
model_vgg16 = VGG16()
3.加载和准备图像
接下来,我们可以将图像加载进来,并转换成预训练网络所要求的张量规格。
Keras提供了一些工具来帮助完成这一步骤。
首先,我们可以使用load_img()函数加载图像,并将其大小调整为224×224像素所需的大小。
from keras.preprocessing.image import load_img

# 载入图像
img_file = 'evimg16tf.jpg'
image = load_img(img_file, target_size=(224, 224)) # 因为VGG16的模型的输入是224x224
接下来,我们可以将像素转换为NumPy数组,以便我们可以在Keras中使用它。我们可以使用这个img_to_array()函数。
from keras.preprocessing.image import img_to_array

# 将图像数据转numpy array
image = img_to_array(image) # RGB

print("image.shape:", image.shape)
VGG16网络期望单色阶(grey)或多色阶图像(rgb)来作为输入;这意味着输入数组需要是转换成四个维度:
(图像批次量,图像高,图像宽, 图像色阶数) -> (batch_size, img_height, img_width, img_channels)
我们只有一个样本(一个图像)。我们可以通过调用reshape()来重新调整数组的形状,并添加额外的维度。
# 调整张量的维度
image = image.reshape((1, image.shape[0], image.shape[1], image.shape[2]))

print("image.shape:", image.shape)
接下来,我们需要按照VGG在训练ImageNet数据一样的方法来对图像进行前处理。具体来说,从论文里谈到:
The only preprocessing we do is subtracting the mean RGB value, computed on the training set, from each pixel.
Very Deep Convolutional Networks for Large-Scale Image Recognition, 2014.
Keras提供了一个称为preprocess_input()的函数来为VGG网络准备新的图像输入。
from keras.applications.vgg16 import preprocess_input

# 准备VGG模型的图像
image = preprocess_input(image)
4.做一个预测
我们可以调用模型中的predict()函数来预测图像属于1000个已知对像类型的概率。
# 预测所有产出类别的概率

y_pred = model_vgg16.predict(image)
from util import decode_predictions

# 将概率转换为类别标签
label = decode_predictions(y_pred)

# 检索最可能的结果,例如最高的概率
label = label[0][0]

# 打印预测结果
print('%s (%.2f%%)' % (label[1], label[2]*100))
VGG19
from self_vgg19 import VGG19
from keras.preprocessing import image
from keras.applications.vgg19 import preprocess_input
from util import decode_predictions

# 载入权重
model_vgg19 = VGG19(weights='imagenet')
# 载入图像档
img_file = 'evimg16tf.jpg'
image = load_img(img_file, target_size=(224, 224)) # 因为VGG19的模型的输入是224x224

# 将图像数据转为numpy array
image = img_to_array(image) # RGB
print("image.shape:", image.shape)

# 调整张量的维度
image = image.reshape((1, image.shape[0], image.shape[1], image.shape[2]))
print("image.shape:", image.shape)

# 准备模型所需要的图像前处理
image = preprocess_input(image)

# 预测所有产出类别的概率
y_pred = model_vgg19.predict(image)

# 将概率转换为类别标签
label = decode_predictions(y_pred)

# 检索最可能的结果,例如最高的概率
label = label[0][0]

# 打印预测结果
print('%s (%.2f%%)' % (label[1], label[2]*100))
ResNet50
from self_resnet50 import ResNet50
from keras.preprocessing import image
from keras.applications.resnet50 import preprocess_input
from util import decode_predictions

# 载入权重
model_resnet50 = ResNet50(weights='imagenet')

# 载入图像
img_file = 'evimg16tf.jpg'

# 因为ResNet的模型的输入是224x224
image = load_img(img_file, target_size=(224, 224))

# 将图像数据转为numpy array
image = img_to_array(image) # RGB
print("image.shape:", image.shape)

# 调整张量的维度
image = image.reshape((1, image.shape[0], image.shape[1], image.shape[2]))
print("image.shape:", image.shape)

# 准备模型所需要的图像前处理
image = preprocess_input(image)

# 预测所有产出类别的概率
y_pred = model_resnet50.predict(image)

# 将概率转换为类别标签
label = decode_predictions(y_pred)

# 检索最可能的结果,例如最高的概率
label = label[0][0]

# 打印预测结果
print('%s (%.2f%%)' % (label[1], label[2]*100))
InceptionV3
from self_inception_v3 import InceptionV3
from keras.preprocessing import image
from keras.preprocessing.image import load_img
from keras.applications.inception_v3 import preprocess_input
from keras.applications.inception_v3 import decode_predictions

# 载入权重
model_inception_v3 = InceptionV3(weights='imagenet')

# 载入图像
img_file = 'evimg16tf.jpg'
# InceptionV3的模型的输入是299x299
img = load_img(img_file, target_size=(299, 299))

# 将图像数据转为numpy array
image = image.img_to_array(img) # RGB
print("image.shape:", image.shape)

# 调整张量的维度
image = image.reshape((1, image.shape[0], image.shape[1], image.shape[2]))
print("image.shape:", image.shape)

# 准备模型所需要的图像前处理
image = preprocess_input(image)

# 预测所有产出类别的概率
y_pred = model_inception_v3.predict(image)

# 将概率转换为类别标签
label = decode_predictions(y_pred)

# 检索最可能的结果,例如最高的概率
label = label[0][0]

# 打印预测结果
print('%s (%.2f%%)' % (label[1], label[2]*100))
MobileNet
from self_mobilenet import MobileNet
from keras.preprocessing import image
from keras.applications.mobilenet import preprocess_input
from keras.applications.mobilenet import decode_predictions

# 载入权重
model_mobilenet = MobileNet(weights='imagenet')

# 载入图像
img_file = 'evimg16tf.jpg'

# MobileNet的模型的输入是224x224
image = load_img(img_file, target_size=(224, 224))

# 将图像数据转为numpy array
image = img_to_array(image) # RGB
print("image.shape:", image.shape)

# 调整张量的维度
image = image.reshape((1, image.shape[0], image.shape[1], image.shape[2]))
print("image.shape:", image.shape)

# 准备模型所需要的图像前处理
image = preprocess_input(image)

# 预测所有产出类别的概率
y_pred = model_mobilenet.predict(image)

# 将概率转换为类别标签
label = decode_predictions(y_pred)

# 检索最可能的结果,例如最高的概率
label = label[0][0]


# 打印预测结果
print('%s (%.2f%%)' % (label[1], label[2]*100))
总结 (Conclusion)
在这篇文章中有一些个人学习到的一些有趣的重点:
- 在Keras中己经预建了许多高级的图像识别的网络及预训练的权重
- 需要了解每种高级图像识别的网络的结构与输入的张量
- 了解不同高级图像识别的网络的训练变数量与预训练的权重可以有效帮助图像识别类型的任务